Note: all the pictures on this page are thumbnails. Click on them to see the large picture.
My exposure to traditional Japanese embroidery is through the teachings of Kurenai-kai, an association of Japanese embroiders who stitch in the thousand-year-old Japanese tradition. Kurenai-kai, in an effort to spread the knowledge and techniques of Japanese embroidery opened a center in Atlanta, Georgia (in the United States). My embroidery teacher in the United States, Connie Dunham was a American woman who was trained by Kurenai-kai. I also attended Kurenai-kai biweekly classes when I lived in Japan.
I'm not referring to these other forms of embroidery from Japan: rozashi, bunka (punchneedle) and sashiko. These forms use different techniques, fabrics, and threads.
|
| Hanazume - my Phase I |
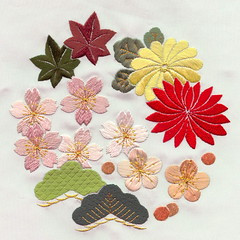
I'm just beginning to learn Japanese embroidery. For English-speaking stitchers, Kurenai-kai has a series of "Phases" for students in which they progress through the different techniques and styles. One of the Phase 1 projects is Hanazume (flower circle).
As in much Japanese art, nature and seasons are popular subjects. Hanazume is a "four-season" piece in which the flowers and plants together represent different seasons. Cherry blossoms (sakura) represent spring, chrysanthemums for summer, maple leaves for fall, pine for winter and plum blossoms are late winter/early spring. Through working on this teaching piece, I've learned the very basics of how properly lace and tighten the silk fabric to the stitching frame, how to make twisted silk thread, and how to work with both twisted and flat silk thread. There's also a small amount of goldwork in the piece.
If you're interested in learning Japanese Embroidery (and you're not in Japan), I suggest you contact the Japanese Embroidery Center. They coordinate classes in America, England, New Zealand, Australia and other countries. They also can help you find a teacher.
This design is known as "Kusudama", or flower ball. It's a representation of the flower balls that were hung in Japanese homes to freshen the air. Nowadays, kusudama are more generally decorations. For information on the tradition of kusudama, you can read David Lister's article and here's a Google Image Search.
This piece is normally a Phase X project, but my American class decided to do it as a Millennium project. It was designed so that it incorporates all the stitches found in Japanese embroidery.
|
It's a huge design -- about three quarters of the fabric shown will be covered by embroidery. The long piece of fabric will made into a traditional Japanese scroll when finished. This fabric is gold metal laid along the weft, is hard to push a needle through and shows every hole permanently. The pattern is marked on the fabric with a blue ink but it's not very visible in this picture. The three lines in the picture, red, green, and blue are the start of the many cords in the picture. |
||
|
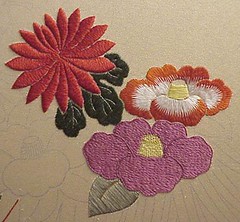
The purple camellia was stitched in twisted thread with tiny diagonal overstitches added to hold the long threads down and add texture. The petals are outlines with a tightly twisted thread called katayori. The center has been started in flat yellow silk. To the upper right, you can see the start to another camellia and to the upper left is part of the chrysanthemum padding. |
||
|
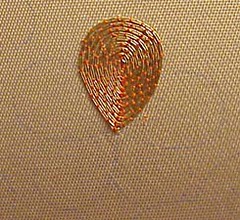
A ume (Japanese plum) flower being worked in goldwork. Two strands of #1 gold are held down by orange couching thread. The thread is started on the other edge and worked inwards. This picture is about one and half times normal size. | ||
|
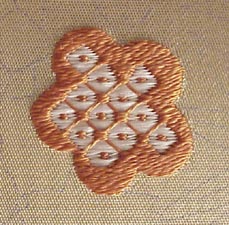
Another ume flower, this time worked in tie-dye effect. This stitch attempts to duplicate the look of a Japanese dyeing technique. First, the flat white silk is stitched over the entire motif. Afterwards, in orange silk, a grid was laid down and tied down by three stitches. Two small stitches were added in the center of each box and finally, the optional edge filling was added. | ||
|
You can see that the padding I put down before is completely covered by red silk now. (The white padding is visible in the full design picture). The pollen of the purple camellia is complete, while it still needs to be finished in the orange and white one. |
This is the first project I started while in the Tokyo class. It will be made in very formal handbag. The fabric is grey with occasional silver metal threads in the weft. Look at the detail to see it more clearly.
|
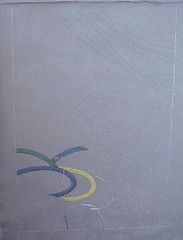
This is full handbag design, with the white lines marking the edges of the handbag and the blue lines are stitching guides. The bottom cords are the front of the bag, the top cords are the back of the bag, but upside down. It will be folded over the center line in the final bag. The white lines really form a rectangle, the distortion is my photography error. |
||
|
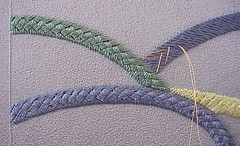
Here you can see just the front of the bag, showing some of the work completed. When working the cord, you first prepare by couching a metal thread (#4) along each side and laying padding in the center and then overlaying this with the colored thread. The single silver thread you see on the right of the picture lines one side of the cord, the dangling silver thread is going to be used to line the other side of the cord. No padding work is visible here. The dangling gold thread (the one ending in a needle) is being used to accept the upper blue cord. | ||
|
In this larger than life detail, you can see the irregular weave of the background fabric. Three of the cords are stitched in one technique, the upper blue cord has a background of blue twisted thread and is just starting to be accented with two strands of #1 gold. |
This is the second project I've started in the Tokyo. My classmates are making an obi (the wide belt worn with kimono) while I'm using a smaller piece of fabric to make a picture.
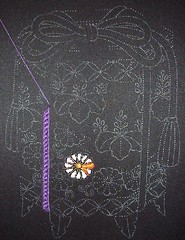
Boxes of this sort were used to hold the shells in used in a game. Each side of the inside of a shell would be painted in a matching picture. The goal of the game was to match as many shell sides as possible. In the obi design, the shells and a cord appear on the front of the obi while the box appears on the back of the obi. I'll need to add the shells to this design because I'll be framing my embroidery as a picture.
|
The design has been added to the fabric in white shell powder. It tends to come off while you're working on the fabric but it can be removed from the fabric once you're finished stitching.
The fabric is a deep black but I had difficulty photographing it. |
||
|
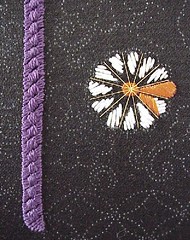
The center of the chrysanthemum has been stitched in orange flat silk
and stitching guidelines along diameters have been stitched along the
petal edges. The stitching guidelines will later be removed.
The overstitching on the petals can be seen in progress. Note that the orange silk is being stitched in a direction opposite that of the padding cotton. A small self-padding stitch is added to the centermost area of each petal before the overstitching is started. |